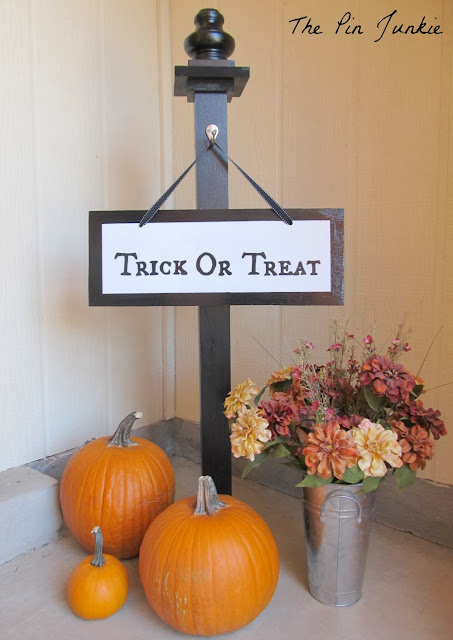
Halloween Porch Sign with Mod Podge
This is a sponsored post from Plaid and Blueprint Social. I received materials and compensation to create a project using Mod Podge. Project design, text, and opinions are my own.
Get your front porch ready for Halloween and let the kids in your neighborhood know that you're passing out candy on the big night with this fun trick-or-treat sign. This sign will last for many Halloweens to come because it was sealed with Mod Podge. Can you believe this was my very first time using Mod Podge! I knew Mod Podge is used for decoupage, but I didn't know that it's also a waterbased sealer that's durable enough to protect projects while being outdoors. Since Mod Podge is waterbased, there are no fumes and cleanup is easy!
To make your own Halloween trick-or-treat sign
here's what you'll need:
here's what you'll need:
piece of wood
drill
white spray paint
ruler
pencil
newspaper or carbon paper
black acrylic paint
paint brushes
mod podge
ribbon
I used a piece of scrap wood that was 19.5 inches by 7.5 inches. I drilled two holes 1.5 inches from the top of the board and 4 inches in from the sides.
Then I spray painted the board white.
I used Microsoft Word to type up and enlarge the words for the sign. When the white spray paint was dry, I measured where to place the words to make sure the lettering was centered and straight.
I put newspaper between the words and the sign and used a pencil to trace the outline of each letter while being sure to press down hard with the pencil. Since the ink easily comes off newsprint, the newsprint transfers your marks to the wood. If you have carbon paper, it works better at transferring than newspaper, but newspaper will work in a pinch.
Here's the lettering transferred onto the sign.
Next, I went over the transfered letters with a wide black Sharpie. I also measured a one inch boarder on all four sides of the sign. The Sharpie provides a good strong line so you know where to paint.
I used black acrylic paint to paint the letters and the boarder of the sign.
Once the black paint was completely dry, I applied a coat of Mod Podge.
The Mod Podge looks like white glue when it goes on, but don't worry. It dries clear and adds a nice glossy finish.
I let it sit overnight to let the Mod Podge completely dry. Then I put the ribbon through the holes of the sign and tied the ribbon on the back. You can hang your sign just about anywhere, but I hung mine on a post I made a few months ago for my front porch. I love changing the decorations with the different seasons and times of the year.
Get ideas from fellow crafters on Plaid's Facebook Page.
Follow Plaid for Inpiration on Pinterest.


Really cool idea! I only recently discovered what mod podge was...Thanks for sharing.
ReplyDeleteMod Podge has been around for awhile, but this is my first time using it. It's very versatile and I'm looking forward to using it in other projects!
DeleteIt looks great and I love the sign!!
ReplyDeleteThank you for linking to Super Sunday Sync!
Such a cute sign! Thanks for linking up to The DIY'ers!
ReplyDeleteThis is so adorable! :)
ReplyDeleteThanks for joining the Link Up this week! Don't forget to enter the giveaway!
Cute and easy idea. Thanks for sharing.
ReplyDeleteI am your newest follower.
Judy
What a fun sign and I love how you have it hanging by the front door! I need one of those for mine!!!
ReplyDeleteCute--and looks great on the porch!
ReplyDeleteAs usual…gorgeous! Love the trick or treat sign! Thanks for sharing at the Twirl & Take a Bow party!
ReplyDeleteLeslie
House on the Way
love this idea. and love the outdoor mod podge. i used it to apply fabric to a pair of shoes and its holding up well! thanks for linking up to the all things pretty party!
ReplyDeleteThis is really cute! I've been wanting one of those porch posts for signs and such ;-)
ReplyDeleteI love painting wood and this one is perfection. The simple, clean look of it makes my heart go pitter patter. :) Thanks for sharing how you made it, it looks great. Thank you for linking up to Thrifty Thursday.
ReplyDeleteCool idea, you are invited to share this with Show Your Stuff:
ReplyDeletehttp://juliejewels1.blogspot.com/2013/10/show-your-stuff-99.html
This is a very cute sign! Love it :)
ReplyDeleteit's terrific! Thank you for sharing at the Thursday Favorite Things Blog Hop Hugs!
ReplyDeleteYour sign work is really amazing. Looks store-bought! And this may be weird, but I am totally digging the font and placement :) Thanks for linking up this week!
ReplyDeleteSo simple and cute!! Thanks for linking up on DIY Sunday Showcase!! I'm gonna be pinning this one to our board!!!
ReplyDeleteThanks for pinning Shelly!
DeleteFun little Halloween greeting. Modge Podge is the best! Thanks for sharing with SYC.
ReplyDeletehugs,
Jann
Mod Podge is wonderful stuff! It's been around for a while and I can't believe this is the first time I've used it. It's very versatile and I'm looking forward to using it in other projects!
DeleteLove this sign and the clear instruction of how you made it!
ReplyDeleteThanks for linking to a Round Tuit!
Hope you have a fabulous week!
Jill @ Creating my way to Success
http://www.jembellish.blogspot.com/
What a great idea. I didn't know that about using newspaper in place of carbon paper. I'm going to share your sign on my blog's Facebook page. I'm a new follower from Thursday Favorite Things Blog Hop and What'd You Do This Weekend. If you have a few minutes - pop over for a visit.
ReplyDeleteYou can use a newspaper to transfer a design, but I think carbon paper works better. Thanks for sharing this project on Facebook and thanks so much for stopping by!
DeleteCute sign. Thanks for sharing on SSM!
ReplyDeleteThat is so cute and there are a lot of fun projects here. Thanks tons for linking to Inspire Me. Hugs, Marty
ReplyDeleteHow cute!
ReplyDeletethis is such a great idea, thanks for sharing, Will share this with my twitter followers
ReplyDeleteThanks
Maria
http://www.simplenaturedecorblog.com
Your porch sign looks terrific - marvelous tutorial! I am delighted that you shared with Home and Garden Thursday,
ReplyDeleteKathy
Love this idea! You did a great job!
ReplyDeleteI love this little sign! Thanks for linking up this post to The Weekend re-Treat last week :) Pinned while I was here tonight!
ReplyDeleteShauna @ The Best Blog Recipes
Stopping by from Moonlight and Mason Jars to say Hey!. Very cute idea! Thanks for sharing!
ReplyDeleteOh... I heart Mod Podge! The sign turned out beautifully :)
ReplyDeleteThanks for linking up via Mommy Monday!!
XOXO
How did you make the 'holder' for the sign? I like the idea that you can switch out the signs... I look forward o your response. :)
ReplyDeleteThe directions for making the sign holder are here: http://www.thepinjunkie.com/2013/07/wooden-welcome-post.html
DeleteDo you have instructions on how you made the post that you hung the sign on?
ReplyDeleteThe directions for making the post can be found here: http://www.thepinjunkie.com/2013/07/wooden-welcome-post.html
Delete