How To Apply Vinyl Wall Decals
*As an Amazon Associate I earn from qualifying purchases.
Disclosure: I received a vinyl wall sticker from Icon Wall Stickers in return for a product review. All opinions are my own.
A few months ago I shared my laundry room makeover.
It went from this . . .
|
To this!
|
The laundry room looks so much better than it previously did, but I felt like it was still missing something. It's a very small room and there are three doors, one to the kitchen, one to the garage, and one to the back yard, that are constantly being opened and closed. I wanted to decorate the walls, but I felt like anything I hung on the wall would be in the way of opening and closing doors and possibly even fall off. When Icon Wall Stickers asked if I wanted to try one of their vinyl decals, it seemed like the perfect solution! Icon Wall Stickers has an amazing selection of decals and you can choose from a wide range of colors and sizes. I chose to use the small size which is about three feet wide and one foot tall. I've never applied a vinyl wall decal before. Even though my decal came with good directions, it was really helpful to watch the video on Icon Wall Stickers' website.
Here's what you'll need to apply a vinyl wall decal:
painter's tape and masking tape
tape measure and level
scissors
credit card or driver's license
First, I measured to find the center of the wall and I used a level to make sure the lettering was straight. Once I was sure the vinyl decal was positioned exactly where I wanted it, I used painter's tape to hold the corners of the decal down. I used painter's taped because it won't damage the paint and it's also easily removable so I could reposition the decal to get the placement just right. I really took my time on this step because I wanted the lettering straight. Although vinyl decals are removable, they're not re-positionable or reusable so I had only one chance to get it right.
Then I used masking tape to tape the middle of the the vinyl decal. It's important to use masking tape for this step because it adheres better than painter's tape and you don't want the decal to come loose in the next steps.
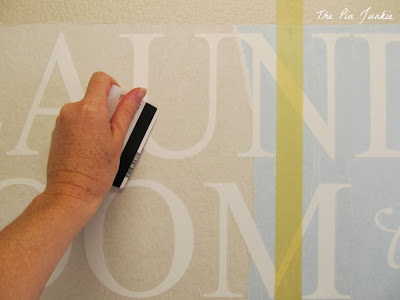
With a credit card or driver's license rub over the decal.
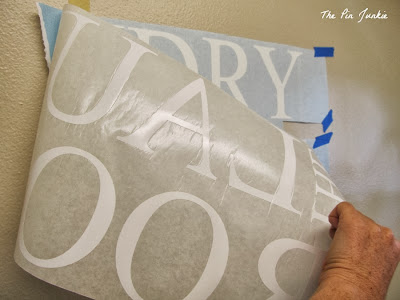
Lift the application paper at one corner and pull it slowly and gently away from the backing paper. Pull only halfway which is marked by the masking tape. Then remove the backing paper.
Slowly lay the application paper on the wall and as you do so, rub the application paper with a credit card or driver's license as you go. Start at the middle of the decal and work out toward the edges. Repeat removing the backing paper and applying the application paper on the opposite side of the decal.
Lift the application paper at one corner. Slowly and gently roll the application paper down away from the wall. Work slowly and use your fingers to gently press down any small pieces of vinyl to make sure they're securely attached to the wall.


Beautiful makeover -- what is the color you used on the top part of the wall? Love it!!!
ReplyDeleteThe color I used is Waverly Home Classics Natural WV37001 at Lowe's. It's the perfect beige. I used it a bathroom makeover too.
DeleteGreat transformation in a small area. You wouldn't think it's the same space.
ReplyDelete#mondayformoms
Love the room. I too have a small space. Is there anyway you can tell me where you got the laundry bags? Love them in addition to the vinyl.
ReplyDeleteI got the laundry bags at Amazon.com. For more details about the this makeover and the materials I used go to http://www.thepinjunkie.com/2013/03/laundry-room-makeover-reveal.html
DeleteI love the white flowers, I can't find them anywhere...
ReplyDeleteThey are available on Amazon. Search for "Umbra Wallflower Wall Décor"
DeleteCool wall decal, thanks for sharing :)
ReplyDelete